Tuesday, April 29, 2014

Collapsible Bustle Panel Tutorial

Okay so I'm finally getting around to this. One of the things I have done with my recent bustles is I sew a laced panel into the inside of the garment which allows the bustle to then collapse for easier storage (because while we all love big bustles, they do need to go somewhere when not being worn).

To start, I would like to say that I do not know how historically accurate this method is. I know some bustles had tie tapes on the inside and others have the flat panels (which this is an adaption of), but you just don't see the inside of that many bustles - outside of the wire ones - to know what the heck is going on in there. I know that the Laughing Moon Patterns uses a similar method for their bustles, but there are no notes about authenticity in the pattern packet.

 For the adaption, you'll need grommets (I use size 00), a grommet setting device, 1/4" white steel boning or industrial size plastic zip ties, and 2-3 yards of lacing ribbon.

To begin, take the inner support panel from your bustle pattern and mark the exact center.

From the center, add 1 3/4" and mark this new spot.

Now this is the tricky part. You must change the pattern piece to allow for a gap between the two panel pieces once they are laced together. Depending on how much of a gap you want, this will affect your next measurement. For a 1" gap, measure 1/2" from the center. For a 2" gap, measure 1" from the center. Just remember that whatever measurement you choose, it will double the actual gap between the panels.

I DO NOT RECOMMEND LEAVING OUT THIS CENTER GAP SINCE IT DOES NOT ALLOW FOR THE PANEL TO BE ADJUSTED ONCE TIED.

Once you've selected the size of your panel gap, move your center line to this spot, making sure to also move the added 1 3/4" on the side. This is your new pattern piece. To retain the original, trace over it using pattern paper or my personal favorite - wax paper.

Cut two pieces from the pattern, one for each side of the panel. Start by zig-zagging, overlocking, or serging the top and bottom edges of the panel pieces.

Along the center, fold the fabric over 1/4" and iron. Fold over an additional 1 1/2" and iron again. All folds should be made toward the inside, meaning the inner area of the bustle.


 Pin the material in place and stitch 1/8" from the inner edge, then stitch 1/2" from the outside edge. This creates the boning and grommet channels.

Fold up the bottom 1/2 " edge of the panel to the inside, iron, then stitch along overlocked edge.


Repeat these steps on the other panel piece.

With both panel pieces, place them side by side and space out the grommets along the grommet channel (this is the wider one at about 1"). Keep in mind that the top of the panel piece will also be folded over 1/2" as well. My spacing recommendation is about 1"-1 1/4" between each grommet. Mark then attach the grommets using your preferred method.

Once the grommets have been set, take the white steel boning or industrial zip ties and measure then cut them to fit the length of the boning channel. For the zip ties, round and smooth the tips to keep them from poking through the material.


Insert into the channel, fold over 1/2" toward the inside and stitch in place the top of the panel pieces.

 This forms your two panel pieces which you sew into the seams following your regular sewing instructions. Once the bustle is finished, lace the panels together as closely as you desire. When you are ready to store the bustle, simply unlace it.

For larger bustles, you may choose to make two sets of panels to be laced and adjusted separately.


NOTE: Red fabric is from my 1880s Bustle, and purple fabric is from my early 1870s bustle. Some of the photos taken were easier to do with the red bustle.


*          *          *

Feel free to leave any questions you might have and I hope this proves helpful for your bustle projects!

Upcoming White & Black Challenge

Okay, so I am bound and determined to have this new challenge finished on time - Challenge #9 Black & White. However I might be fudging things a little with this project. I knew about it a while back when the challenge list was released, and since that point, kept pondering what I would do for Black & White. Each time I kept coming up with the same exact thing - zip, zilch, nada. The creative juices weren't exactly flowing, but the manipulative ones were.

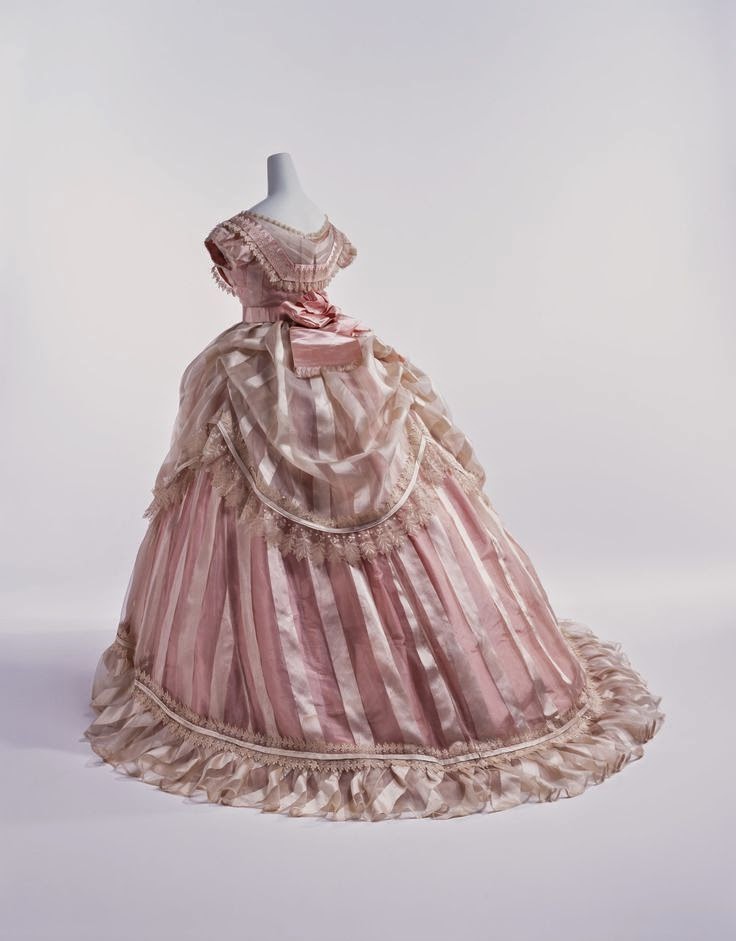
About a year ago, I started work on a mid 1860s ballgown inspired by an original in the Kyoto Costume Institute. 

KCI Evening Gown, 1866
I got the bodice and dress done for the event at the Dress U Conference last spring, but just never got around to making up the overskirt portion of the dress. So this is where I stand with the dress.

Dress U Conference 2013
The challenge is black & white, ivory is a sort of off-white color, therefore ivory counts as part of the challenge, right? Right? Right! Yeah, okay, now you see how my mind works.

Well, onto the actual word - challenge. So the only existing photo of this dress is the one pictured above released by the museum. No close-ups, no detail descriptions, no alternative view. Once again - zip, zilch, nada to really work with for constructing an overskirt.

So I'm going to wing it and do the best I can with what I've got to work with.

I pulled some apron pattern pieces from existing patterns that I own and sort of changed an angle here, shortened and lengthened over there, and did a whole lot of guessing.


Wish me luck, I'm going to cut draft pieces over the next couple of days and put them together to see how everything looks.

Thursday, April 24, 2014

New Web Pages

 
I've spent the last few days putting together some new pages to be added to the blog.

The first is a resources page. These are links and sites that I find myself visiting often when it comes to research, supply ordering, and pattern buying. I've tried to organize them based on what I use each site for and included a small description so you know what each place has to offer.

The Book & Movie Lists is something I've been wanting to do for a while. I love costume dramas (aka costume porn) and they're typically the first thing I reach for to watch while doing sewing. As a movie fiend, I've seen a number of films over the years (both good and bad) and these are some of my favorites. Since I do reviews as well, I'll make sure the links are included when available.

As a bookworm, it's hard not to include a list of good reads. Some of these books are great escapism works of fiction, others are great for a quick read for fact gathering or to add to the bookshelf for costume research. Again, I've tried to organize these based on how I use the books. As a library science graduate, I'm trying to make sure things seem coherent rather than arrange everything using the Dewey Decimal system.

These are only initial lists and I plan to try and update these on a monthly basis with more fun reads and watches, as well as helpful costume resources. If you see anything that might be missing, feel free to leave a comment!

Thursday, April 17, 2014

Shopping at Allyns

So I took a quick trip to Denver over the weekend for a family wedding. While I was in town, my mom and I popped over to Allyns Fabric & Bridal Store. I first heard about this store via the costume community and after looking at some of the photos on their Website, decided to make a visit.


These are all beaded trims and embroidered fabrics with beads.
There is fabric literally stacked in every corner of this place. Even in corners and on ledges.
Costume fabrics stacked floor to ceiling - literally.


This place was costume heaven! They have a little bit of everything - bridal laces and fabrics, beaded trims and fabrics, millinery fabric and supplies, buttons, ribbons, and loads more. We spent about two hours there and a lot of it was spent just looking around at everything and taking it in.

Part of the reason I went was because I was looking for supplies for my Ophelia bonnet and they carried millinery supplies. I found that most of their millinery supplies is better suited for modern day derby hats and fascinators, but I found plenty of other things to take home.

Beaded trim and silk for a small handbag
Two inch wide trim with sequins and bullion work. It's much prettier in person!
Sheer embroidered mauve.
I bought a bunch of ribbon for various projects. Underneath is a pink cotton broadcloth that I found for $3 a yard.
I bought these materials to go together for a 1910s dress.
Hat base that I'll use for an 1860s leghorn.
So many goodies! The stuff I'm most excited about is the ribbon because I've been looking for ribbons for various projects, but hate shopping online because I can't feel or see the final product and of course the craft stores never have a good selection.

My mom helped me pick out the fabric, trim, and velvet ribbon combo that's above for a 1910s dress. I've always wanted to make one at some point, but if I did, I wanted to go all out and make sure it's something extravagant. Still need a lining fabric, but figured that is something that's easy to pick from online or a specialty store.

Price wise, things are a higher cost than what you find at the craft store. It's worth it however if you're looking for specialty or unique items. The employees told us the Denver Arts Council and the Denver Ballet shop there regularly for their costume supplies and they have all kinds of photos everywhere of customer projects and some of them are amazing!

If you're in Denver, make sure to visit!


Sunday, April 6, 2014

Ophelia Regency Bonnet Mayhem

When sewing projects decide to revolt, they apparently like to stage a very large protest. After the difficulties I had with my late bustle bodice, I decided to jump ahead and start on my next HSF challenge project, only to be waylaid by more delays.

We've now reached challenge #7 - Tops and Toes. This time it's creating an accessory to decorate either the head or the feet. I've been wanting to do a Regency period bonnet for a while so I took the jump back in time and started pulling things together.

The last time I made a bonnet, I purchased the pre-made buckram form and all I had to do was cover it with fabric and trimmings. This time I opted to build it from the - ahem - neck up. Not entirely sure of everything I would need, I purchased a bonnet kit from Timely Tresses which came with everything I needed to complete the bonnet for the pattern I had picked out.

Bonnet in a box!
Unfortunately, the kit arrived and was missing the wire connectors and the pre-cut buckram was not large enough for the pattern pieces. Although I did contact the company about the pieces being replaced, they still had not come after two weeks and finally opted to order these supplies on my own. For the record, Judith M Millinery has fast shipping and great prices on millinery supplies.

*Update 4/7/14 - The materials were received in the mail today. Slow mail truck apparently. 

With all the base supplies now in place, I pulled out the buckram last night and started tracing out the pieces and cutting them apart. Then I found that I would need some masking tape. Well, back to the craft store today.

Yes, that's a costume drama being used as a weight
In the meantime, more about the bonnet. The pattern selected was Ophelia, best for use during the years 1810-1820 approximately, and has a shaped brim with a stovepipe headpiece.

Ophelia Pattern from Timely Tresses
I started looking through online museum collections for references of originals, but was finding very little. Instead, I started pulled from fashion plates and there are so many examples! I'm glad I'm being paced by my materials because as of right now, I still have no idea how I want to decorate it. Something with flowers possibly...