Showing posts with label Historical Sew Fortnightly. Show all posts

Wednesday, April 1, 2015

HSF #3 Stashbusting

This is no April Fool's joke, I'm getting up a second post AND finished two small projects today. Hooray! And just in time for it to qualify for a 2015 Historical Sew Fortnightly challenge. I'm trying to make all my projects from my fabric stash this year, so I wasn't following the challenges too much. Challenge #3 was stash busting though, so hooray!

What it is - Young girl's bonnet and apron
Fabric - Reproduction cotton fabric from a leftover project for the bonnet, cotton/poly broadcloth for the apron
Pattern - Simplicity 3725
Year - 1870s through 1890s -ish. I wasn't worried about accuracy because they're for play.
Notions - Satin ribbon, bias tape, iron on interfacing for the bonnet, thread
How historically accurate is it? - See above, I wasn't too worried about their accuracy since they're play items for a young girl.
Hours to complete - About 2 hours to cut out, 6 hours to sew both items.
First worn - Not until her birthday in June
Total cost - $0, it's all from the stash!

Back at Christmas I made a calico dress for the beau's younger sister, Lexie. She loved the dress so much that I pulled out the pattern again and made a couple accessories for the dress using stash materials.
http://www.simplicity.com/p-1992-costumes.aspx

Sunday, June 29, 2014

HSF - Challenge #13 Under $10

Challenge - Under $10

Fabric - 100% cotton reproduction fabric from Windham fabrics. Print is dated for 1845-1865

Pattern - Heavily modified Garibaldi Blouse (TV441) pattern from Truly Victorian

Year - 1850s-1870s, no specific year

Notions - Buttons and poly thread

Hours to complete - About 18

First Worn - Just for photos right now. Still have to make other things to go with it.

Total Cost - Only $0.75. Fabric was in my stash, and thread was leftover from another project. Buttons I found on clearance at the fabric store.

How accurate is it?
To be honest, not really sure. I scoured the internet trying to find photos of frontier style work blouses, but really couldn't come up with anything. As work blouses, these garments were usually worn until they were worn out then discarded, so there are few originals still in existence. Photos did not help either since most frontier/pioneer photos are of families in their Sunday best, not their work clothes. Using other existing reproductions, I heavily modified an existing pattern which is very historically accurate in design.
Lucky 13, I managed to get this challenge done on time! I've been wanting to do a dressed down outfit for a long time (hoop skirts, petticoats, and yards of material can be cumbersome sometimes). I bought this fabric about three years ago with the intention of using it for a bodice or blouse, but never had any firm plans until now. The outfit I finally put together in my brain consisted of a brown skirt to go over a corded petticoat with a simple cotton work blouse with roll-able sleeves.

Pioneer Blouse
Recollections
Blouse
Recollections
Since it was in the stash, I started with the blouse. As mentioned above, there were very few original examples or photos to work from, so I looked at a few reproductions and just sort of started mashing designs together using the Garibaldi blouse pattern as a base. 
1861 Garibaldi Blouse
Garibaldi Blouse TV441
The first change I made was to the chest area. Smashing together different sizes and measurement adjustments, I took the chest in so it wouldn't be as loose fitting and shortened it about 2 inches.

I did the same with the sleeves, taking them in about four sizes so they wouldn't be as puffy, a characteristic of the Garibaldi blouse. The sleeves were also shortened about 4 inches not only to reduce more of the pouf, but due to material shortages.
Original sleeve pattern over the shortened fabric
When I bought my fabric eons ago, I only grabbed 3 yards of it, figuring there would be enough. Right... I used every inch along the length of the fabric with less than 1/4 inch between pieces to maximize space. I even had to piece together the neckband piece.
The other major change I made was to the cuffs. I widened them considerably and added 1" to the length so the ends would overlap. I also widened the placket which would allow me to roll the sleeves up when unbuttoned.
Finished sleeve cuff
After everything was sewn together and stitched down all the loose edges, I added my awesome clearance buttons. When shopping at the store, I had found one style that was okay, but then I found these in the clearance which went nicely. I went ALL of the clearance buttons to find more and lucked out, finding just enough for what I needed for this project.
Total cost came to $0.75. Yippee!
I opted for modern technology when putting in my buttonholes, using my handy dandy buttonhole foot on the sewing machine. I know I need to eventually look into making buttonholes by hand, but decided it wouldn't be on this project at this time.
Buttonholes on cuff
All the buttons are attached by hand though to ensure that they stay attached to the blouse and I finished off all my open edges with a small whipstitch to keep everything in place.
For starting without a mockup, the pattern size mashup turned out very well along with the fit. Although it's still not as fitted as I want through the waist area, I figure I could easily add in some darts if I find the extra material is bothering me too much. Yay for finishing though, since HSF challenges will have to be set aside for right now.

Wednesday, June 4, 2014

Ophelia Bonnet Homestretch

In case you missed the squeals of delight on Facebook, my silks are finally here! Ordered in the middle of March, I endured shipping delays, wrong items being sent, secondary packages which were also delayed...
My beautiful silk from India! Color is actually dark navy.
Yeah, patience has certainly become a virtue where this project is concerned (it was started in early February). Along with my silk issues, I had supplies run out on multiple occasions, which resulted in more delays and frustrations that nearly made me throw in the towel for the whole project.

Before getting started on the covering and trimmings, I'll give a quick progress report on how the actual bonnet construction went.

This was my first venture into hat making where I constructed the base myself. Once I had all my supplies together, it went together very easily, much to my surprise (aside from running out of a few things - AGAIN - during the construction process).
Millinery wire taped and ready to be sewn to the buckram.

Finished crown, pipe, and brim. These are the pieces that make up the full bonnet.
The crown piece and brim are attached to each other using just a whipstitch around the wire and crinoline tape.
Finished form ready for covering.
Like most hand sewing projects though, very slow going but the outcome is certainly rewarding. Although the the buckram form has been sitting around for a bit now, I still look at it and go, "I made that?" Now looking forward to finishing it.

These are all my trimmings which I have been slowly accumulating during the project.
The plan is to cover it with blue silk and line the brim with cream dupioni (not completely period accurate, but this will be on the inside and not as noticeable). Still have to play with the ribbons, but the wide cream will be used for the ties, and the thinner cream and pale green for pipe trims. The flowers, bing cherries, and leaves will go at the very top of the crown, similar to the ones in my research plates.

Keep your fingers crossed that the next time I post about the bonnet, it will be finished!
And just for fun, a late night selfie from when I had actually finished the bonnet.

Monday, May 26, 2014

HSF - Challenge #9 Black & White

Challenge - Black & White

Fabric - Poly/cotton broadcloth blend

Pattern - Truly Victorian Petticoats pattern (TV170)

Year - Natural Form period, about 1876-1882

Notions - Hooks and eyes for the waistband

Hours to complete - 14

First Worn - For waistband measurements. Will be wearing soon as I work on construction a Natural Form dress

Total Cost - $0, all materials were already in my stash and the pattern is one of my basics that I use frequently.


How historically accurate is it?
The pattern I use matches the silhouette needs of the Natural Form period with a slim front and some fullness towards the back. Everything is machine sewn however, so I don't know how accurate that would be in comparison to an original from that same time.

 
Yargh, I've really been slacking for my May posts. On the plus side though, I finished an item off the aforementioned project list. Double bonus, it works for one of the challenges! It's a few days late, but given my recent history with project issues, I'm not going to worry too much about being a little behind (still working on challenge #5 and #7).

The Natural Form period is one of the few areas of the Victorian Era that I don't have a dress from so I decided to make one up. Like many projects though, you have to start at the basics. In this case it was by making a petticoat. All the ones I currently have are fitted to go over hoop cages or bustles so there's a lot of extra material in them. The point of the Natural Form period is that things are very natural meaning there's very little modification to the silhouette outside of the corset.

Examples of Natural Form dress - Image via Pinterest
I dug out from my trusty TV170 pattern, which I use for most of my petticoats since it's a very universal, and managed to find the right amount of fabric in my stash then got to work.

It took a couple of nights to get everything pinned together and sewn because I like to pin and set my own ruffles rather than try to use a running stitch. The process can be very tedious at times, but the result is certainly worth it in my opinion because the ruffles are usually evenly balanced the entire length of the seam.

Hand pinned ruffles along lower tier

When going through the sewing machine, I just guide the fold in the direction I choose or press them flat.

Although Natural Form is known for some of the long, trained skirts with oodles of frills (see the above fashion plate for example), I opted to go with an untrained petticoat from the standpoint that it would be able to go under other costumes. Instead, for the trained skirts, I'll use a detachable balayeuse or dust ruffle. But that's another project for another time.

Sunday, May 18, 2014

Attacking the UFOs

The last time I had posted, I discussed the start of an overskirt for a ball gown that I have in the closet but have just never gotten around to finishing. I was all ready to get started on it, and then this funny little thing called life happened.

I had more setbacks with my long overdue bonnet project. Mother's Day popped up and I found myself wanting to make things for my awesome mumsy. I had project materials finally come in so I could finally finish a few things. Best of all, I get to go to my best friend's wedding in October! Her wedding theme is Alice in Wonderland, so I've been starting to put together costume ideas in my brain that could work and have been spending a lot of time looking at pictures from the recent Tim Burton film version.

Any who, that's another post for another day.

With all the UFOs (Un-Finished Projects) laying around, I decided to put aside my Black and White Challenge and make a list of the UFOs that needs to be tackled. 
  • Wedding samplers for friends
  • Regency Ophelia bonnet
  • Late bustle evening bodice
  • Black skirt from Vogue
  • Petticoat to go under a Natural Form (1877-1882) period dress
  • Calico Garibaldi blouse
Mind you, these are just the projects that are sitting out immediately in my living room. I'm sure there's more buried in my room.

Today was a good start to tackling this list. I finished my long overdue cross stitch piece, at least one of them.
Now to head off to the framer!

The petticoat should be fairly easy. I pulled out my favorite petticoat pattern from Truly Victorian (TV170) which covers almost the entire Victorian Era. With the exception of the bottom hem piece and the waistband, everything has been put together.
I'll be off in a couple more days so I should be able to get the last row ruffled and hemmed, and the waistband added.

Tuesday, April 29, 2014

Upcoming White & Black Challenge

Okay, so I am bound and determined to have this new challenge finished on time - Challenge #9 Black & White. However I might be fudging things a little with this project. I knew about it a while back when the challenge list was released, and since that point, kept pondering what I would do for Black & White. Each time I kept coming up with the same exact thing - zip, zilch, nada. The creative juices weren't exactly flowing, but the manipulative ones were.

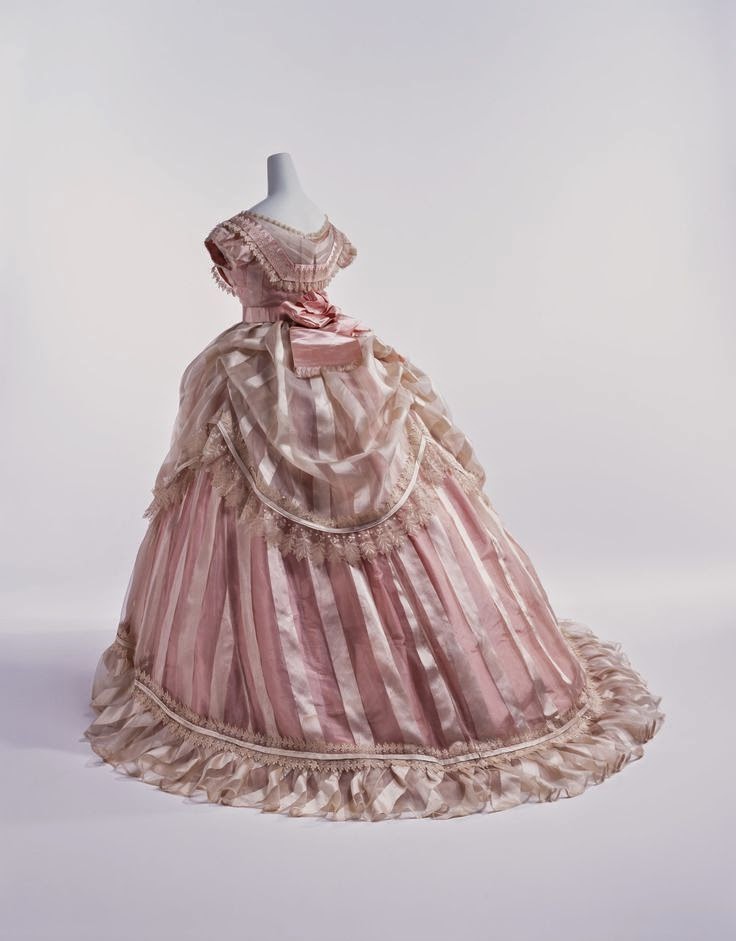
About a year ago, I started work on a mid 1860s ballgown inspired by an original in the Kyoto Costume Institute. 

KCI Evening Gown, 1866
I got the bodice and dress done for the event at the Dress U Conference last spring, but just never got around to making up the overskirt portion of the dress. So this is where I stand with the dress.

Dress U Conference 2013
The challenge is black & white, ivory is a sort of off-white color, therefore ivory counts as part of the challenge, right? Right? Right! Yeah, okay, now you see how my mind works.

Well, onto the actual word - challenge. So the only existing photo of this dress is the one pictured above released by the museum. No close-ups, no detail descriptions, no alternative view. Once again - zip, zilch, nada to really work with for constructing an overskirt.

So I'm going to wing it and do the best I can with what I've got to work with.

I pulled some apron pattern pieces from existing patterns that I own and sort of changed an angle here, shortened and lengthened over there, and did a whole lot of guessing.


Wish me luck, I'm going to cut draft pieces over the next couple of days and put them together to see how everything looks.

Sunday, April 6, 2014

Ophelia Regency Bonnet Mayhem

When sewing projects decide to revolt, they apparently like to stage a very large protest. After the difficulties I had with my late bustle bodice, I decided to jump ahead and start on my next HSF challenge project, only to be waylaid by more delays.

We've now reached challenge #7 - Tops and Toes. This time it's creating an accessory to decorate either the head or the feet. I've been wanting to do a Regency period bonnet for a while so I took the jump back in time and started pulling things together.

The last time I made a bonnet, I purchased the pre-made buckram form and all I had to do was cover it with fabric and trimmings. This time I opted to build it from the - ahem - neck up. Not entirely sure of everything I would need, I purchased a bonnet kit from Timely Tresses which came with everything I needed to complete the bonnet for the pattern I had picked out.

Bonnet in a box!
Unfortunately, the kit arrived and was missing the wire connectors and the pre-cut buckram was not large enough for the pattern pieces. Although I did contact the company about the pieces being replaced, they still had not come after two weeks and finally opted to order these supplies on my own. For the record, Judith M Millinery has fast shipping and great prices on millinery supplies.

*Update 4/7/14 - The materials were received in the mail today. Slow mail truck apparently. 

With all the base supplies now in place, I pulled out the buckram last night and started tracing out the pieces and cutting them apart. Then I found that I would need some masking tape. Well, back to the craft store today.

Yes, that's a costume drama being used as a weight
In the meantime, more about the bonnet. The pattern selected was Ophelia, best for use during the years 1810-1820 approximately, and has a shaped brim with a stovepipe headpiece.

Ophelia Pattern from Timely Tresses
I started looking through online museum collections for references of originals, but was finding very little. Instead, I started pulled from fashion plates and there are so many examples! I'm glad I'm being paced by my materials because as of right now, I still have no idea how I want to decorate it. Something with flowers possibly...


Tuesday, February 18, 2014

Bodice Challenge Research

So I started out the new challenge with a bit of research on the type of bodice design I would like to make. As mentioned in a previous post, the bodice I currently have is more of a dinner style bodice. To allow for more use and opportunities, I want to make an evening bodice. About two years ago, I made a bodice with small pouf sleeves using the Truly Victorian 1885 Cuirass Bodice (TV460).


I never really finished because the sleeves were very tight and I just wasn't too keen on this bodice going with my Alexandra dress. I've looked through a number of fashions plates and I just can't seem to find anything with this sleeve style. Initially I was thinking of taking this bodice apart and trying to use some supplies from the bodice for a new one. However, after going through my books, I'm thinking I might be able to redo the sleeves, do some add-ons, and make a different bodice with the brown shantung as the base.

For example, I found these ideas in my Bustle Fashions 1885-1887 and Directoire Revival Fashions 1888-1889, both by Frances Grimble.

From Bustle Fashions 1885-1887 by Frances Grimble
From Directoire Revival Fashions 1888-1889 by Frances Grimble
Right now, I'm liking bodice #2 with the lace and ribbons because it's something that I can work into the existing square neckline and I can make new sleeves that will easily attach to the existing bodice.

Now onto the the actual evening bodice that I wanted to make. This one I was a bit torn on. These are my fabrics (the blue is actually darker) - a chocolate brown shantung silk and a dusty blue taffeta with flocked brown polka dots.


What I couldn't decide on was whether I wanted to make a brown bodice with blue accents, or a blue polka dot bodice with some brown accents. A lot of the fashion plates I was looking through had solid colored bodices, not prints. Then I found this little gem:

From Victorian Fashions and Costumes from Harper's Bazar by Stella Blum
Yay polka dots on an evening bodice! I pulled out my sketchbook and did some rough (I am not an artist) drawings on what I would like to accomplish. 
 
I've done my measurements, and I think I have enough of the fabric for an evening bodice. The shantung is something they readily carry at the fabric store and I will need to pick up more later this week. If I don't have enough of the blue taffeta, I may look at doing a bodice with some panels of brown on the side, similar to how this one has been done.

From La Mode Illustree by JoAnne Olian
In the meantime, I'm going to start looking at trims to use for the dinner bodice neckline and doing some pattern drafting for a back-closing evening bodice.

Friday, February 7, 2014

HSF - Challenge #3 Pink

Challenge - Pink!

Fabric - Dupioni silk and acetate lining

Pattern - Hand-drafted pattern

Year - The original piece from LACMA is dated about 1800-1825. Mine will probably be used for Victorian events.

Notions - Machine stitched lace with beads and sequins, pre-made cord with tassels attached, and upholstery trim.

Hours to complete - About 18.

First Worn -  No idea when I'll use it. No upcoming events.

Total Cost - $23, all of it was purchased on gift cards though so no out of pocket expenses.

How accurate is it?
Probably about 50/50. I used the original for inspiration, but changed the design and structure around based on what I know about modern sewing construction. There was no information actually available about how the original was sewn/put together, so it was a lot of guesswork. Most of it is machine sewn, the detail work is by hand. Fabric and materials were mostly modern creations including the upholstery trim and acetate lining. Design wise it's very accurate though since it follows the three-panel original.


*          *          *
After completing the mockup, I jumped straight the final reticule cut from my fashion fabrics. After cutting all my pieces out, I sewed everything together. While doing this though, I carefully maneuvered the tassel ends into place and sewed them directly into the corner seams. I had looked at the tassels beforehand, but couldn't figure out how to attach them in place without the threads showing. The ends I went ahead and anchored to the fabric within the seam allowance.

The ends were anchored using just a zigzag stitch
The pre-made lace that I had bought had to be sewn on by hand - there was no other option. Using just a simple overhand stitch method with matching thread, I attached it in place to the exterior of the bag.

Interior showing back of stitching for lace
Part of the reason I drafted my own pattern was I carefully measured out the side pieces to match the LACMA original and the length of each repeated section of the lace. When I stitched it around the entire bag, I managed to make the ends meet perfectly and carefully overlaped them so the join was barely noticeable.

I won't say where, but there's two ends of lace in there somewhere
The lining I wasn't concerned too much about so it's made of just an acetate lining fabric. It was sewn the same way as the exterior bag, however I did leave a small opening in one of the side seams so I could turn everything right side out after sewing both bags together.


Once everything was sewn and turned out, I used the small opening to thread the tasseled chair cord I had bought through the drawstring opening and around the lining. The rose silk extended another half inch to the inside to help hide the lining and give it a more finished look.

To keep the drawstring cord in place and prevent it from coming loose, I added a small running stitch along the seam line.


The final step was to sew the opening closed along the inside using just a simple whipstitch and then voila! all finished.


I'm really happy that I managed to finish this challenge ahead of time since it will allow me to start focusing on the next challenge. Although this was a small project, I'm glad I took it on because of the amount of hand sewing that it required. I can be a very impatient person sometimes so I'm not a fan of handwork. Having such a lovely piece to admire after the outcome makes me appreciate it a little more though.