Showing posts with label Wonderland Wedding. Show all posts

Tuesday, December 30, 2014

Wonderland Wedding Costumes

A little bit of catch-up before the last of the year. This is one last (overdue) post from the wedding. Nearly everyone dressed up for the event and I had to share all the costumes.
Kerry as the March Hare, my costume was the Queen of Hearts

Jenna's grandparents as the White Rabbit and the Queen of Hearts (left), and her parents on the right.
Mollie as the caterpillar and Justin as the March Hare.
Ryan as a card guard and Jessica as the Cheshire Cat.
Allison (Queen of Diamonds), Jamie (Mad Hatter), Joe (also Mad Hatter), Tom (Caterpillar), Erin (card guard).
Ben as the King of Hearts.
Lasha as the White Rabbit
Jenna as Alice and Joe as the Mad Hatter (the lovely bride and groom).
After the ceremony, we hung out in Jackson Square until the reception. While we waiting, there were a number of costumed people walking by for Halloween later that night. These two lovely ladies walked past and I HAD to snap a quick photo. They were so pretty in person!

Thursday, November 13, 2014

Queen of Hearts Dress Costume

So my final bridesmaid's dress for the Wonderland Wedding did a little bit of evolution as I worked on it throughout this summer and fall. Originally it started out to keep it very basic and uniform since the initial plan was to go as a card guard. Then I found some photos of Victorian fancy dress costume.
Playing card themed dress. Unknown date.
Queen of Spades costume c. 1905.
Along with my can-can research, it inspired me to do a number of add-ons, including my heart bloomers and the ribbon trim along the edges of my bloomers and bodice sleeves, and the hearts on them. In addition, I maxed out on the accessories.
Astoria Shoes
Red clocked stockings
Stockings and shoes were from from American Duchess.
 Matching garters from Zofi Design.
What really changed the direction of the dress though was the heart tiara, from Venus Jewelry. Originally I was going to do some type of fascinator, but I couldn't say no to the tiara and after I put it on, everyone wanted to know if my costume was the Queen of Hearts. I went with it and said yes, especially after we took this picture with Ben, the King of Hearts.
So here is the finished dress in all its glory.

Although I wasn't sure about the sleeves initially, but they certainly grew on me the more I wore the dress because somehow they just "work" with it. However we have found that due to their size, there's a number of photos where they're peeking out of the corner of the frame.
Since this a costume dress, I set up the bodice to lace up the back, rather than worry about hidden hooks and eyes. Originally, I had also planned to sew some hearts near the skirt hem, but then ran out of time. Looking at all the photos, I think I'm going to just leave it off.
Underside of the skirt and my bloomers in action.
The best part of course was the underside of the skirt. For all the swearing and cursing that went into it, it was absolutely fantabulous! There was a lot of skirt flipping because I had to show it off.

I had such a blast in this dress. It's definitely going in the "too keep" pile and I really hope I get another chance to wear it again soon!

Friday, November 7, 2014

Alice Wedding Dress Finished

Well I'm back from New Orleans and now have enough motivation to sit down and sort through photos. The wedding went off without a hitch and Jenna loved her dress! I don't really have too many construction photos leading up to the final dress, but I have plenty of photos of her Alice dress.

Jenna loved the final dress and everything fit great on her. Although color shopping was done based on online web pictures everything matched Joe's - the groom - suit.
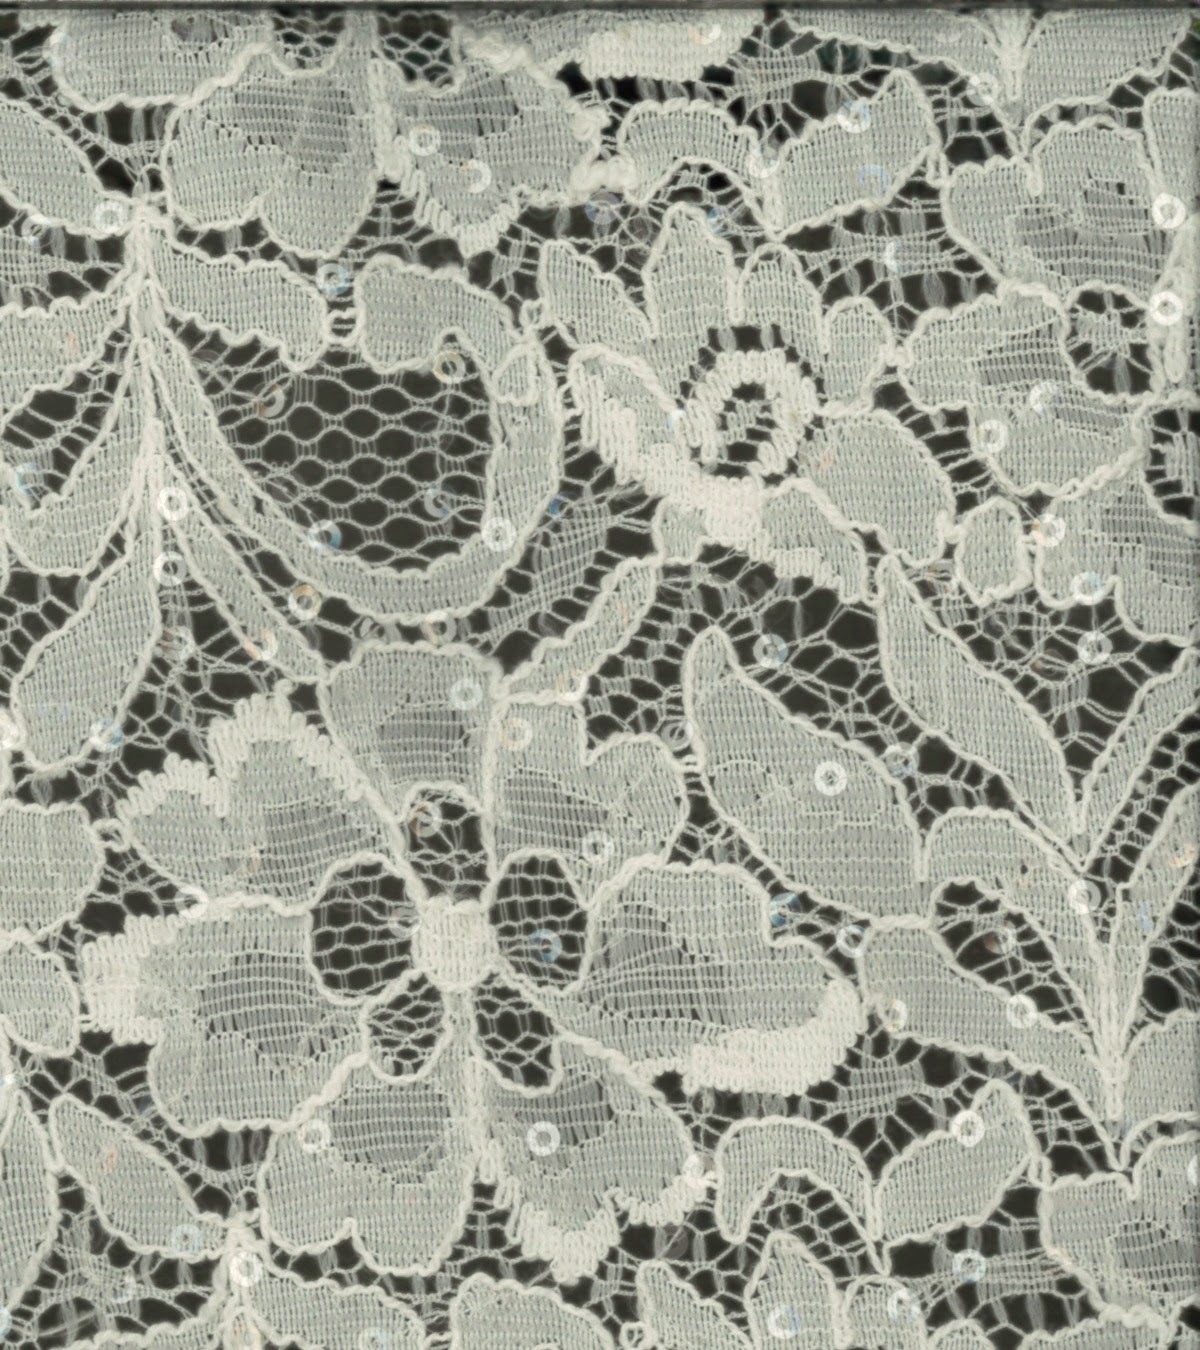
For the finished bodice, a powder blue satin was selected and it miraculously matched her stockings. For the a little extra something, I sewed a small lace trim along the edge of the bias trim. The blouse was a bridal lace with clear sequins sewn over a white sateen cotton fabric.
The back was finished with silver grommets and a double faced white satin ribbon to go with the skirt.
The skirt itself was spectacular. In order to show off the ruffles underneath, Jenna came up with a hooking method to pull the skirt up and back to show off the underside.
The sides are hooked at the very back underneath the bodice and create a nifty drape effect at the back.
Walking down Jackson Square, the wedding location.
Perfect weather and perfect location for a great wedding with wonderful people. We had a great time and I'll make sure to post pictures of my dress and of the costumes worn by the other guests over the next couple of days. 
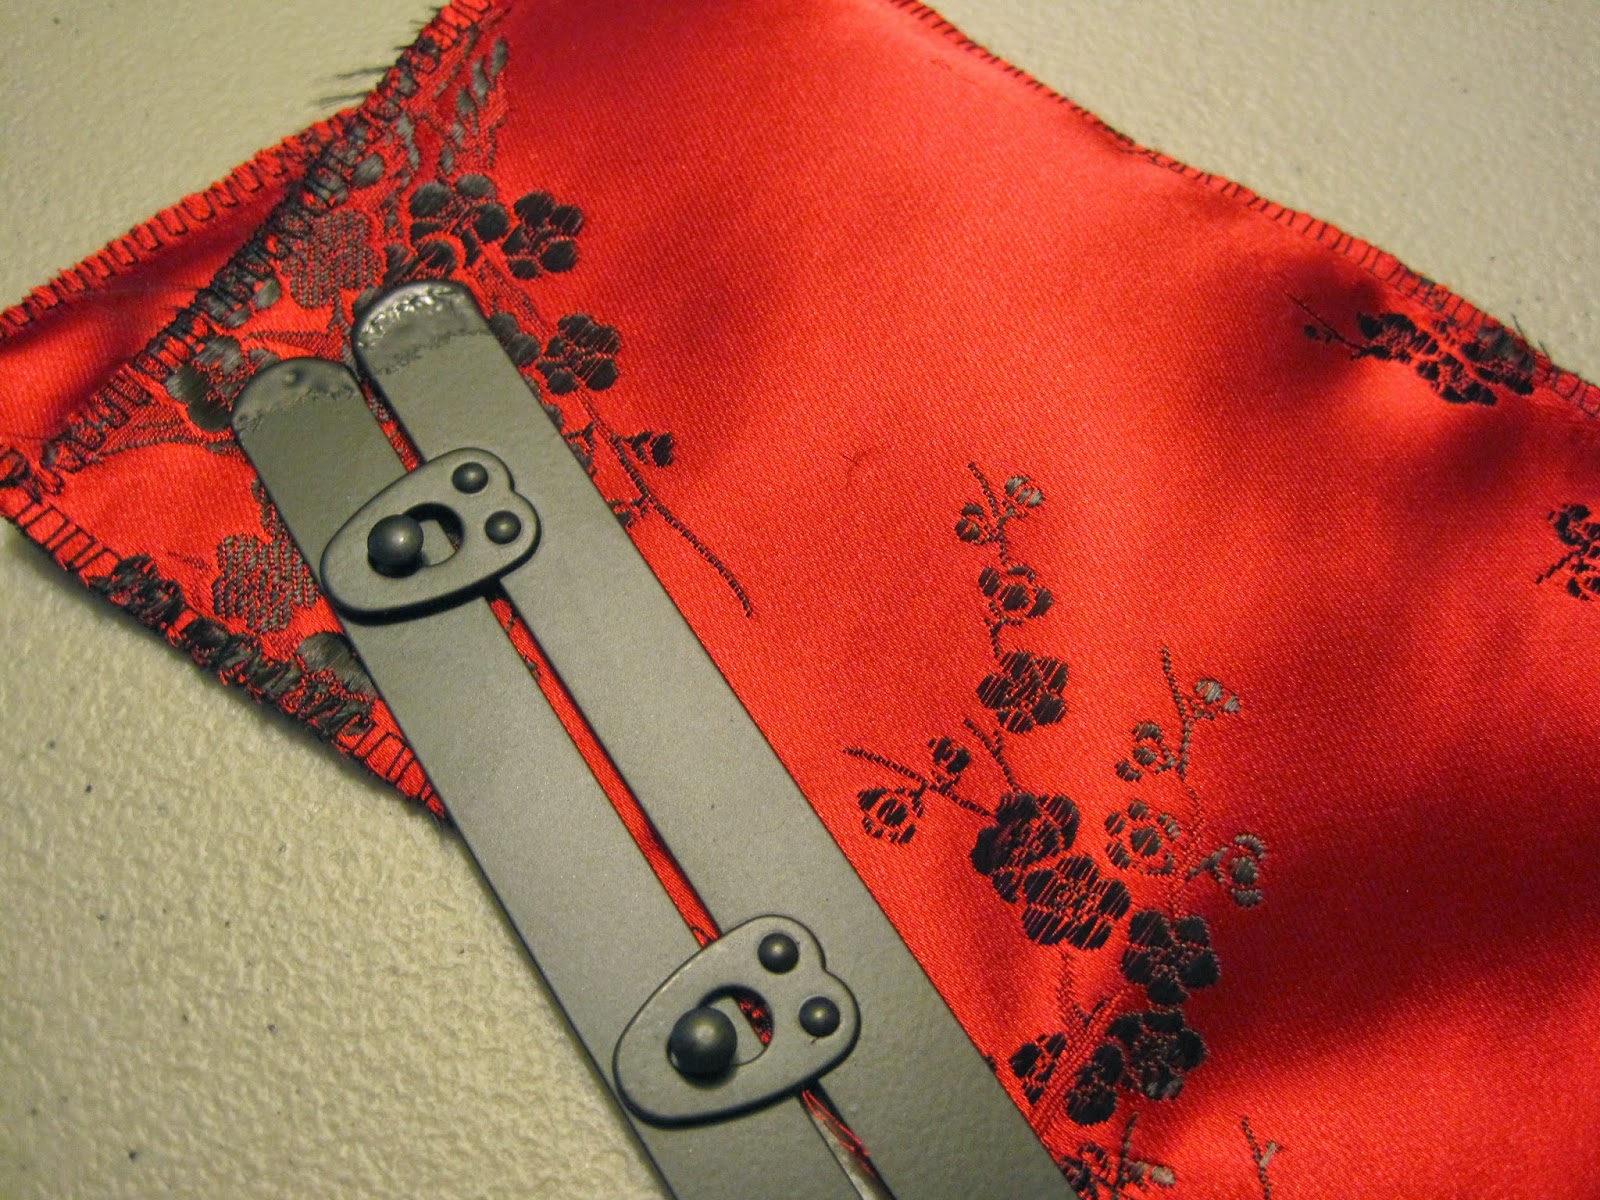
*           *          *
Bodice
Pattern: Mashup between Butterick 3906 and the waist cincher from Simplicity 1819 with heavy modifications.

Fabric: Cotton twill lining and interlining, powder blue poly satin for the fashion fabric and self-made bias tape.

Notions: 1/4" wide lace trim for edges of bias, silver grommets, 7" busk, and white poly satin ribbon for lacing.

Blouse
Pattern: Blouse from Simplicity 1819 with modifications, sleeves added from Sense and Sensibility Regency gown pattern.

Fabric: White cotton sateen for lining, bridal lace with sequins for the outer layer.

Notions: Sewing thread

Skirt
Pattern: Cancan skirt (TV280) shortened for the bride's preference

Fabric: White poly satin for outside, white poly/cotton broadcloth lining with ruffles made from cotton quilting fabrics.

Notions: Hooks and eyes for the waistband, large thread covered hooks and eyes for "bustling" the dress.

Friday, October 24, 2014

Wonderland Wedding Homestretch

Only a week left and there's still so much to do!

Thankfully Jenna's dress is one bias strip and three pieces of lace away from being finished (So. Much. Hand sewing). Since she is the bride, her dress has always been at the top of the priority list.

Mine on the other hand... Yeah that's a different story. Right now, I still have to
  • attach sleeves to bodice
  • line said bodice and finish seams
  • add heart cutouts to skirt hem
  • finish bias edges on my corset
  • modify a hair accessory for the outfit
Four days of mayhem, coming right up. Because the wedding is in Louisiana, all - ALL - of the machine work has to be done before I get on the plane next Wednesday. Airlines are a little finicky about taking your sewing machine on the plane with you.

In the meantime, here's how my bodice has been progressing.

Because of the black and red color story, things were a little crazy while cutting out pieces. Not only did I have five separate fabrics to work with, I had to re-pin everything five times as well. Needless to say your project can seem a bit daunting when all you have to look at is this:
Lining, lining, interlining, outside, and outside. Yeah, it's a lot of pieces.
But with a bit of patience - which I'm sorely lacking right now - and sewing, it quickly turns into this:
All the bodice pieces sewn together. Yay!
And while sewing, I've learned that I really need to invest in bulk quantities of featherlite boning. I hate running to the store for more just because I need 1 yard of it.

The sleeves for this are quite ridiculously over the top. Because my base pattern is for an 1890s bodice (TV490), I wanted it to have sleeves to go with it. I pulled the 1890's Sleeve pattern (TV495) from my stash and used a modified version of View 4 with the flair. As mentioned in my heart bloomers post, I added ribbon along the flair to reflect my color scheme.
I also added some of my hearts from the pattern drew to the sleeves (just to make them that much more crazy).
And now I've got these giant white balloon thingies sitting on my sewing table.
Not sure how I feel about them right now, but due to lack of time, they'll have to work. Hopefully they'll look loads better once they're actually attached to the bodice.
 

Thursday, October 16, 2014

I Heart My Heart Bloomers

Okay, so my can-can research left me feeling a little inspired and I was definitely looking for something to wear under my dress so the - ahem - modern unmentionables wouldn't show. Short bloomers was the answer so I picked up a multi-length bloomer pattern at the store.
Simplicity.com
I used the shortest length, since I have plans for some accessories, and cut the pieces out. Thank goodness for large floor space because some of the pieces were huge.
I chose black fabric to contrast against a lot of the red that's underneath the skirt. I followed most of the included directions, making only a few changes to the decorations and sewing methods based on prior experiences and wearer preferences. The biggest change was I eliminated the lace/ribbon along the edge seams, and instead top-stitched red and white ribbon along the ruffles at the bottom.

Part of the reason is because it will go with additions to my bodice (more on that later).
A day and a half later, I finished. Then I felt inspired a little more. I free hand drew a heart and cut one out of my red fabric. After playing with it a bit, I marked a spot, pinned in place, and went to town.
So I loved my little ribbon-trimmed bloomers to start, and then I added the heart, and now I'm completely in love with them! Can't wait to wear them at the end of the month for the wedding!
 *           *          *
Pattern: Simplicity 2777, view E with some modifications. Self-drafted heart cutout.

Fabric: Red and black cotton/poly blend broadcloth.

Notions: Red and white poly satin ribbon for trim and drawstring at waist.

Wednesday, October 1, 2014

Red Cherry Blossom Corset

So in amongst my sewing for the wedding dress, I have still been slowly working my way through my own dress. One thing I decided to do was make a corset because:
a) my powder blue one looks odd with all the black and red 
b) what the hey, I'll take any excuse to make a new one

I got lucky and found a remnant piece of a cherry blossom brocade at Joann's that worked perfectly, and I had some black twill from a leftover project.
The fabric is more of a cherry red.
I pulled out my Truly Victorian (TV110) pattern pieces from my prior corset project and after rechecking measurements, made a secondary adjustment by letting out the hips one size. Once the adjustment was made, I recut the pieces and cut out the twill and brocade.
The next step was flat lining everything. A fun task since the brocade starts to fray as soon as it's cut and I ran out of thread during the process.
Along with thread, I had to order a new busk as well. Rather than use a standard busk with silver fastenings, I special ordered a black busk. When it came and I put it together with the material, I'm so glad I did.
I've had the last couple of days off from work, so I spent my time getting everything stitched together. Now I just having the boning channels, grommets, and binding to add and it will be finished!

Dress Fitting - Round Two

Last night we did a secondary fitting for Jenna's dress and with the exception of a couple minor tweaks, we're in a spot to start putting together the final outfit! Hoorah!

Per her request, I'm refraining from putting up too many detail photos since she wants it to be a surprise for the wedding. Here is what I can show outside of the previous fitting:

A small peek at the skirt -
A swatch of the satin for the bodice -
https://www.denverfabrics.com/p143_10353-powder-blue-satin
Denverfabrics.com
 And a swatch of lace for the blouse -
http://www.joann.com/bridal-inspirations-fabric-sequin-lace-ivory/12116406.html#prefv3=Whites&prefn1=isProject&prefn2=isVideo&q=lace&prefn3=refinementColor&prefv2=false&prefv1=false&start=40
Joann.com
 Stay tuned for the end of October for the big reveal!

Sunday, September 14, 2014

Alice Dress Update #2

Last post I put up this preview pic of some fabric:
Jenna is also doing a can-can style skirt (TV 280) for her wedding dress and to help make it her own, she decided to pick a different fabric for each ruffle. Because we had to shorten it for height and preference, we ended up with six different fabrics. After picking up these and a white satin to go on the outside, I started work on the skirt.

Like the first skirt, there was a lot of wedge cutting and line transfer. I also made a different pattern piece since we had to shorten the hem several inches.
Then more fabric strip cutting.

One change I made though was rather than cut and sew my ruffle strips as I needed them, I cut all of them and sewed them at once. 
Like the diamond fabric for my skirt, I had to piece one of the fabrics for this skirt. I'm not sure how but the repeat on the pattern worked out that I only had to shorten the actual length of the ruffle by 2" and there was no repeat.
Can you spot the seam?
Having the strips all cut, sewed, and ready to go cut down on the work time immensely and I managed to get about four of the strips attached in one day (one is halfway pinned).
I have another day off this Tuesday so armed with a bunch of pins, I'll finish the last two rows.