Monday, May 26, 2014

HSF - Challenge #9 Black & White

Challenge - Black & White

Fabric - Poly/cotton broadcloth blend

Pattern - Truly Victorian Petticoats pattern (TV170)

Year - Natural Form period, about 1876-1882

Notions - Hooks and eyes for the waistband

Hours to complete - 14

First Worn - For waistband measurements. Will be wearing soon as I work on construction a Natural Form dress

Total Cost - $0, all materials were already in my stash and the pattern is one of my basics that I use frequently.


How historically accurate is it?
The pattern I use matches the silhouette needs of the Natural Form period with a slim front and some fullness towards the back. Everything is machine sewn however, so I don't know how accurate that would be in comparison to an original from that same time.

 
Yargh, I've really been slacking for my May posts. On the plus side though, I finished an item off the aforementioned project list. Double bonus, it works for one of the challenges! It's a few days late, but given my recent history with project issues, I'm not going to worry too much about being a little behind (still working on challenge #5 and #7).

The Natural Form period is one of the few areas of the Victorian Era that I don't have a dress from so I decided to make one up. Like many projects though, you have to start at the basics. In this case it was by making a petticoat. All the ones I currently have are fitted to go over hoop cages or bustles so there's a lot of extra material in them. The point of the Natural Form period is that things are very natural meaning there's very little modification to the silhouette outside of the corset.

Examples of Natural Form dress - Image via Pinterest
I dug out from my trusty TV170 pattern, which I use for most of my petticoats since it's a very universal, and managed to find the right amount of fabric in my stash then got to work.

It took a couple of nights to get everything pinned together and sewn because I like to pin and set my own ruffles rather than try to use a running stitch. The process can be very tedious at times, but the result is certainly worth it in my opinion because the ruffles are usually evenly balanced the entire length of the seam.

Hand pinned ruffles along lower tier

When going through the sewing machine, I just guide the fold in the direction I choose or press them flat.

Although Natural Form is known for some of the long, trained skirts with oodles of frills (see the above fashion plate for example), I opted to go with an untrained petticoat from the standpoint that it would be able to go under other costumes. Instead, for the trained skirts, I'll use a detachable balayeuse or dust ruffle. But that's another project for another time.

Sunday, May 18, 2014

Attacking the UFOs

The last time I had posted, I discussed the start of an overskirt for a ball gown that I have in the closet but have just never gotten around to finishing. I was all ready to get started on it, and then this funny little thing called life happened.

I had more setbacks with my long overdue bonnet project. Mother's Day popped up and I found myself wanting to make things for my awesome mumsy. I had project materials finally come in so I could finally finish a few things. Best of all, I get to go to my best friend's wedding in October! Her wedding theme is Alice in Wonderland, so I've been starting to put together costume ideas in my brain that could work and have been spending a lot of time looking at pictures from the recent Tim Burton film version.

Any who, that's another post for another day.

With all the UFOs (Un-Finished Projects) laying around, I decided to put aside my Black and White Challenge and make a list of the UFOs that needs to be tackled. 
  • Wedding samplers for friends
  • Regency Ophelia bonnet
  • Late bustle evening bodice
  • Black skirt from Vogue
  • Petticoat to go under a Natural Form (1877-1882) period dress
  • Calico Garibaldi blouse
Mind you, these are just the projects that are sitting out immediately in my living room. I'm sure there's more buried in my room.

Today was a good start to tackling this list. I finished my long overdue cross stitch piece, at least one of them.
Now to head off to the framer!

The petticoat should be fairly easy. I pulled out my favorite petticoat pattern from Truly Victorian (TV170) which covers almost the entire Victorian Era. With the exception of the bottom hem piece and the waistband, everything has been put together.
I'll be off in a couple more days so I should be able to get the last row ruffled and hemmed, and the waistband added.

Tuesday, April 29, 2014

Collapsible Bustle Panel Tutorial

Okay so I'm finally getting around to this. One of the things I have done with my recent bustles is I sew a laced panel into the inside of the garment which allows the bustle to then collapse for easier storage (because while we all love big bustles, they do need to go somewhere when not being worn).

To start, I would like to say that I do not know how historically accurate this method is. I know some bustles had tie tapes on the inside and others have the flat panels (which this is an adaption of), but you just don't see the inside of that many bustles - outside of the wire ones - to know what the heck is going on in there. I know that the Laughing Moon Patterns uses a similar method for their bustles, but there are no notes about authenticity in the pattern packet.

 For the adaption, you'll need grommets (I use size 00), a grommet setting device, 1/4" white steel boning or industrial size plastic zip ties, and 2-3 yards of lacing ribbon.

To begin, take the inner support panel from your bustle pattern and mark the exact center.

From the center, add 1 3/4" and mark this new spot.

Now this is the tricky part. You must change the pattern piece to allow for a gap between the two panel pieces once they are laced together. Depending on how much of a gap you want, this will affect your next measurement. For a 1" gap, measure 1/2" from the center. For a 2" gap, measure 1" from the center. Just remember that whatever measurement you choose, it will double the actual gap between the panels.

I DO NOT RECOMMEND LEAVING OUT THIS CENTER GAP SINCE IT DOES NOT ALLOW FOR THE PANEL TO BE ADJUSTED ONCE TIED.

Once you've selected the size of your panel gap, move your center line to this spot, making sure to also move the added 1 3/4" on the side. This is your new pattern piece. To retain the original, trace over it using pattern paper or my personal favorite - wax paper.

Cut two pieces from the pattern, one for each side of the panel. Start by zig-zagging, overlocking, or serging the top and bottom edges of the panel pieces.

Along the center, fold the fabric over 1/4" and iron. Fold over an additional 1 1/2" and iron again. All folds should be made toward the inside, meaning the inner area of the bustle.


 Pin the material in place and stitch 1/8" from the inner edge, then stitch 1/2" from the outside edge. This creates the boning and grommet channels.

Fold up the bottom 1/2 " edge of the panel to the inside, iron, then stitch along overlocked edge.


Repeat these steps on the other panel piece.

With both panel pieces, place them side by side and space out the grommets along the grommet channel (this is the wider one at about 1"). Keep in mind that the top of the panel piece will also be folded over 1/2" as well. My spacing recommendation is about 1"-1 1/4" between each grommet. Mark then attach the grommets using your preferred method.

Once the grommets have been set, take the white steel boning or industrial zip ties and measure then cut them to fit the length of the boning channel. For the zip ties, round and smooth the tips to keep them from poking through the material.


Insert into the channel, fold over 1/2" toward the inside and stitch in place the top of the panel pieces.

 This forms your two panel pieces which you sew into the seams following your regular sewing instructions. Once the bustle is finished, lace the panels together as closely as you desire. When you are ready to store the bustle, simply unlace it.

For larger bustles, you may choose to make two sets of panels to be laced and adjusted separately.


NOTE: Red fabric is from my 1880s Bustle, and purple fabric is from my early 1870s bustle. Some of the photos taken were easier to do with the red bustle.


*          *          *

Feel free to leave any questions you might have and I hope this proves helpful for your bustle projects!

Upcoming White & Black Challenge

Okay, so I am bound and determined to have this new challenge finished on time - Challenge #9 Black & White. However I might be fudging things a little with this project. I knew about it a while back when the challenge list was released, and since that point, kept pondering what I would do for Black & White. Each time I kept coming up with the same exact thing - zip, zilch, nada. The creative juices weren't exactly flowing, but the manipulative ones were.

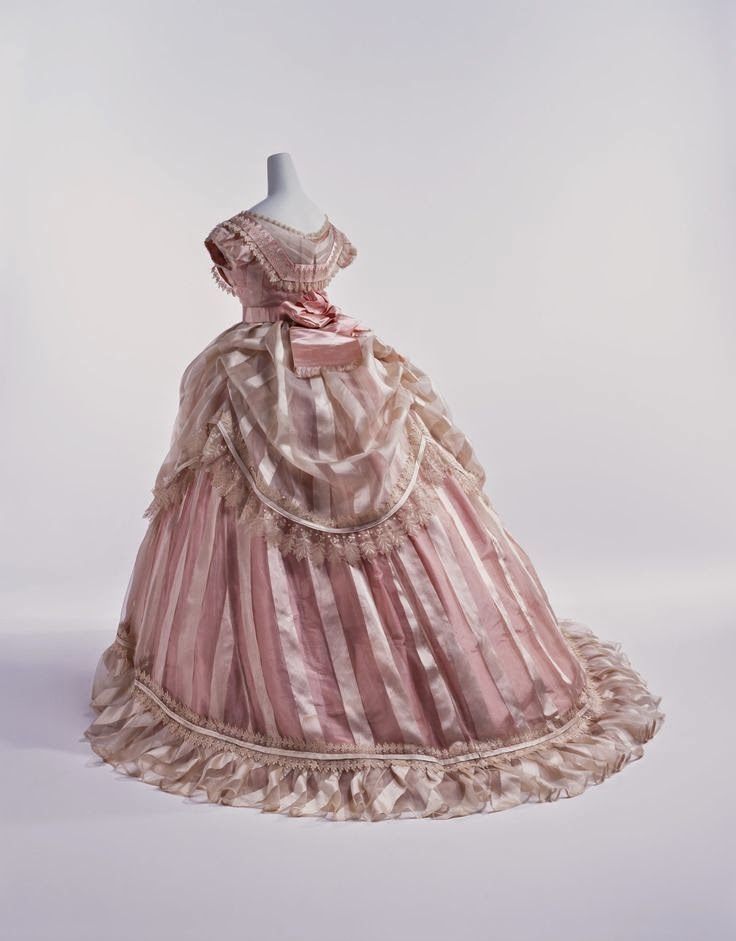
About a year ago, I started work on a mid 1860s ballgown inspired by an original in the Kyoto Costume Institute. 

KCI Evening Gown, 1866
I got the bodice and dress done for the event at the Dress U Conference last spring, but just never got around to making up the overskirt portion of the dress. So this is where I stand with the dress.

Dress U Conference 2013
The challenge is black & white, ivory is a sort of off-white color, therefore ivory counts as part of the challenge, right? Right? Right! Yeah, okay, now you see how my mind works.

Well, onto the actual word - challenge. So the only existing photo of this dress is the one pictured above released by the museum. No close-ups, no detail descriptions, no alternative view. Once again - zip, zilch, nada to really work with for constructing an overskirt.

So I'm going to wing it and do the best I can with what I've got to work with.

I pulled some apron pattern pieces from existing patterns that I own and sort of changed an angle here, shortened and lengthened over there, and did a whole lot of guessing.


Wish me luck, I'm going to cut draft pieces over the next couple of days and put them together to see how everything looks.

Thursday, April 24, 2014

New Web Pages

 
I've spent the last few days putting together some new pages to be added to the blog.

The first is a resources page. These are links and sites that I find myself visiting often when it comes to research, supply ordering, and pattern buying. I've tried to organize them based on what I use each site for and included a small description so you know what each place has to offer.

The Book & Movie Lists is something I've been wanting to do for a while. I love costume dramas (aka costume porn) and they're typically the first thing I reach for to watch while doing sewing. As a movie fiend, I've seen a number of films over the years (both good and bad) and these are some of my favorites. Since I do reviews as well, I'll make sure the links are included when available.

As a bookworm, it's hard not to include a list of good reads. Some of these books are great escapism works of fiction, others are great for a quick read for fact gathering or to add to the bookshelf for costume research. Again, I've tried to organize these based on how I use the books. As a library science graduate, I'm trying to make sure things seem coherent rather than arrange everything using the Dewey Decimal system.

These are only initial lists and I plan to try and update these on a monthly basis with more fun reads and watches, as well as helpful costume resources. If you see anything that might be missing, feel free to leave a comment!